> For the complete documentation index, see [llms.txt](https://ova-themes.gitbook.io/aovis/llms.txt). Markdown versions of documentation pages are available by appending `.md` to page URLs; this page is available as [Markdown](https://ova-themes.gitbook.io/aovis/movie/setup-movie-ticket-booking-process.md).
# Setup movie ticket booking process
## 1) Create Cart Movie Page
* Go to Pages >> Edit "Cart Movies" (if you import demo data) or Click Add New Page >> You have to insert shortcode in page: \[mb\_cart/]
* If you are using Elementor, you have to "Inactive" cache for Text Edior Element.
## 2) Setup Cart in Movie Setting
Go to **Movies >> Settings >> General >> Cart Page: choose Cart Movies**
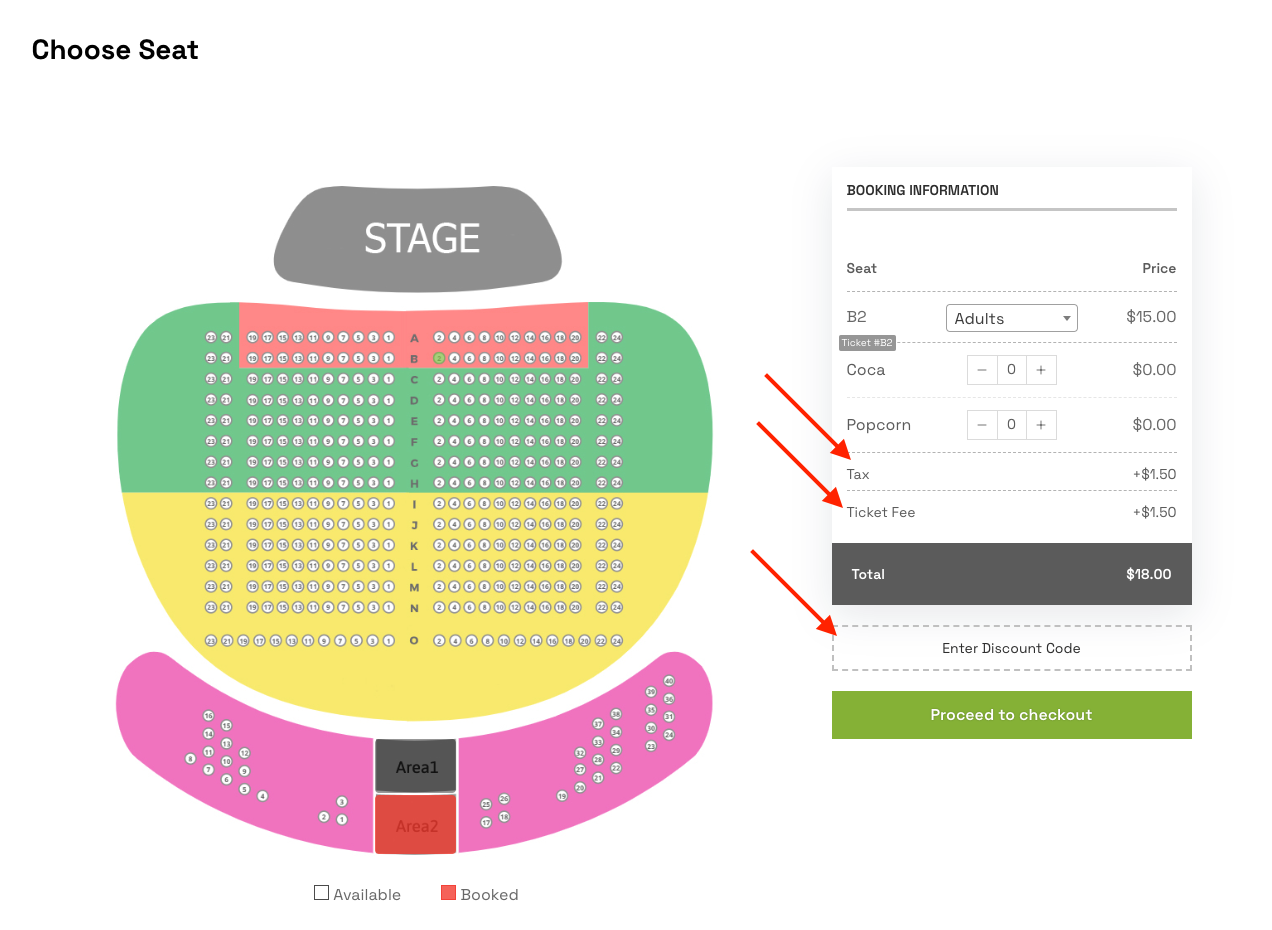
## 3) Setup Tax, Ticket Fee, Discount in Cart Page
Go to **Movies >> Settings >> Tax**
## 4) Setup Checkout Page
### a) Create a Product in WooCommerce
Go to Products >> Add New or choose "Movie booking" (if you import demo data)
### b) Setup Payment Gateway in WooCommerce
Go to **WooCommerce >> Settings >> Payment: Choose payment gateway to use**
### c) Setup Checkout Page in WooCommerce
Go to **WooCommerce >> Settings >> Advanced >> Choose Cart and Checkout Page**
In Tour Detail page, if you want, when you click Booking button, the system will redirect to the Checkout page.
Please add the code below to the `functions.php` file in your child theme
```
add_filter('woocommerce_add_to_cart_redirect', 'skip_cart_go_checkout');
function skip_cart_go_checkout() {
return wc_get_checkout_url();
}
```
### d) Setup Checkout in Movie Settings
Go to **Movies >> Settings >> Checkout**
* **Allow to Add ticket when Order status:** The system use WooCommerce for payment tickets, so you have to choose status of Order WooCommerce to send tickets to customer.
Order WooCommerce Status depends payment gateway: [Read here ](https://woocommerce.com/document/managing-orders/order-statuses/)
* **Choose a hidden product in Woocommerce:** Choose product that you [make above](#a-create-a-product-in-woocommerce).
* **Secret Key QR Code:** You can insert any character.
* **Thank you page:** The system will redirect to this page after the customer payment successfully.
* **Holding Tickets:** Maximum Payment time for each movie booking.
* **Remove fields in Checkout Form of WooCommerce:** [Read here](https://developer.woocommerce.com/docs/customizing-checkout-fields-using-actions-and-filters/) or you can install extra plugin for this.
Display Maximum time to complete payment in the frontend
## 5: Setup Mail
### a) New Order
* Go to **Movies >> Settings >> Mail >> New Order**
When this feature is enabled, the system will automatically send a confirmation email after a booking is placed.
### b) PDF Ticket
The PDF Ticket will be attached in New Order Email. You can Add Logo and Change color for PDF Ticket
You can customize PDF Ticket template in child theme
```
Copy file
plugins/movie-booking/templates/pdf/template.php
to
themes/aovis-child/ovamb-templates/pdf/template.php
```
### c) Reminder
Go to **Movies >> Settings >> Mail >> Remind**
When this feature is enabled, the system will automatically send a reminder before the showtime.
### d) Cancellation Email
Go to **Movies >> Settings >> Mail >> Cancel**
When this feature is enabled, the system will automatically notify the customer when a booking is canceled