> For the complete documentation index, see [llms.txt](https://ova-themes.gitbook.io/aovis/llms.txt). Markdown versions of documentation pages are available by appending `.md` to page URLs; this page is available as [Markdown](https://ova-themes.gitbook.io/aovis/scan-qr-code/website.md).

# Website

## Step 1: Config in Movie Settings <a href="#step-1-create-an-user-in-site" id="step-1-create-an-user-in-site"></a>

* You have to setup this before the customer booking an movie.
* Go to Movies >> Settings >> General tab >> "Scan Qrcode via" opiton choose "Website"

<figure><img src="/files/kaBNSGnyDVuG3VZaRjD4" alt=""><figcaption></figcaption></figure>

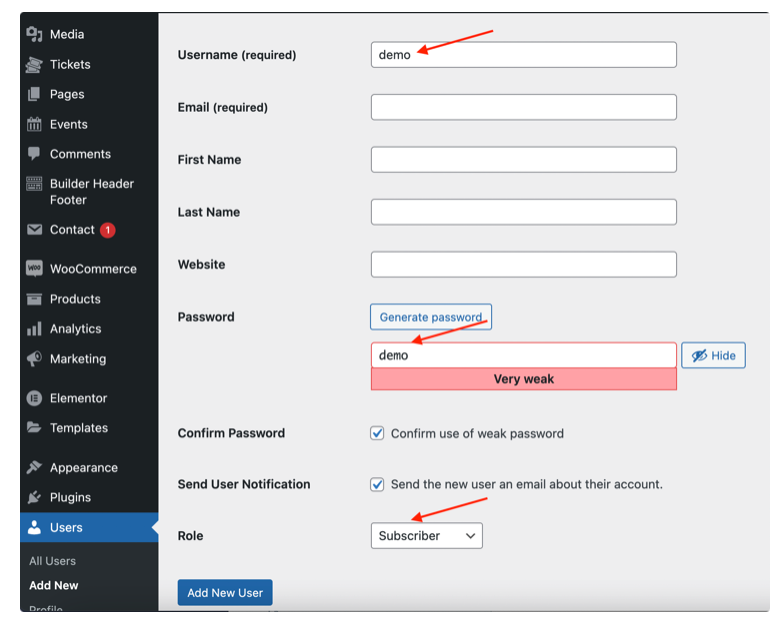
## Step 2: Create an user in site <a href="#step-1-create-an-user-in-site" id="step-1-create-an-user-in-site"></a>

Go to Users >> Add New

Example:&#x20;

**Username**: demo&#x20;

**Password**: demo

<figure><img src="/files/m03SmxEMCBROGa75DzgM" alt=""><figcaption></figcaption></figure>

## Step 3: Assign username to per Movie <a href="#step-2-assign-username-to-per-movie" id="step-2-assign-username-to-per-movie"></a>

Go to Movies >> Choose a movie to edit >> Insert Username to "Username of staff" setting

<figure><img src="/files/sc8xDw4g1fx3NxrmxmDj" alt=""><figcaption></figcaption></figure>

## Step 4: Login website with "demo" account in mobile.

Note: You have to use Default Browser in mobile to access website.

<div><figure><img src="/files/v0qCpHGXHGWeDJpO6P4R" alt=""><figcaption></figcaption></figure> <figure><img src="/files/omosKoMnA1gv5eEvREUI" alt=""><figcaption></figcaption></figure></div>

## Step 5: Use Camera of mobile to scan QR Code

<figure><img src="/files/KiZXEsDC3Kb2jOj8fjau" alt="" width="375"><figcaption><p>Use Camera to scan QR Code</p></figcaption></figure>

<figure><img src="/files/sKwhyuorpvL77P8znV0Y" alt="" width="375"><figcaption><p>Display result page.</p></figcaption></figure>