> For the complete documentation index, see [llms.txt](https://ova-themes.gitbook.io/muzze/llms.txt). Markdown versions of documentation pages are available by appending `.md` to page URLs; this page is available as [Markdown](https://ova-themes.gitbook.io/muzze/global/install-theme.md).
# Install Theme
## **1:** Requirements for our theme
**Require Server/Hosting with some config:**
max\_execution\_time = 180
max\_input\_time = 600
post\_max\_size = 60M
upload\_max\_filesize = 60M
PHP 7.x, 8.x (Recommend 8.1.x)
Mysql 5 or higher
WordPress latest Version
## **2: Download Theme**
After purchasing our theme from Themeforest, you will need to download the theme package for your use. To download the package, please login to your Themeforest account, navigate to “**Downloads**”, click the “**Download**” button in the left of the theme, choose “**All files & documentation**” to download our theme package to your computer.
After downloading, you have to **UNZIP package file**, you will see these files:
**Theme File:** Includes **your\_theme.zip** file that consists of everything you need to install the theme.
**Child Theme File:** Includes **your\_theme-child.zip** file
**Demo Import Folder:** Includes .xml, .wie, .json file for import content, cubeportoflio, widget
**Plugins Folder:** Include **a**ll **local plugins** use in theme
**Changelog file:** Include **readme.txt.** Read to know changes in all version.
**Documentation Folder**: Includes Documentation file that helps you get to know about theme and guides you to build your site with our theme.
**Licensing Folder:** Includes the licensing files of Themeforest purchase.
## **3: Install Theme**
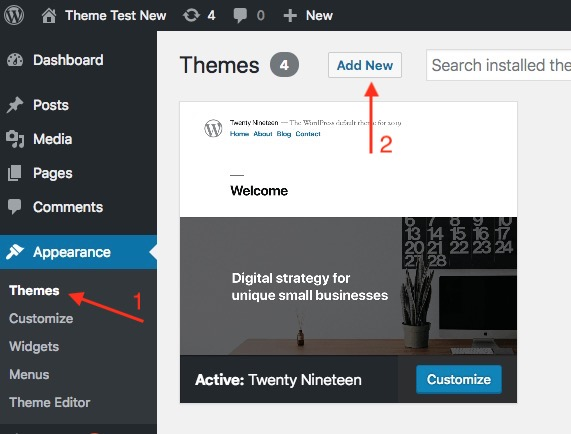
### **Step 1:** From "Admin Menu"**,** click Appearance >> Themes >> Add New
### **Step 2:** Install "Parent Theme"muzze**.zip"**
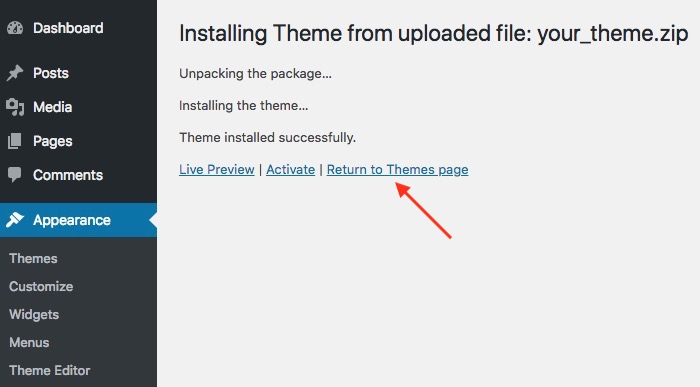
Then**,** upload "Parent theme", Click on " Return to Themes page " to install "Child Theme"
### **Step 3:** Installing "Child Theme" muzze**-child.zip**
Installing "Child Theme" muzze**-child.zip is the same as** installing "Parent theme"
### **Step 4:** Active "Child Theme"
After uploading " Child Theme ", click on " Activate " button
### **Step 5:** Install and Active Plugins
1: Click on " begin installing plugins " button
2: choose plugins, then choose " install " field and click on " Apply " button
3: Go to Dashboard >> Plugins >> Installed Plugins, then choose plugins, choose " active " field and click on " apply " button
## **4: Import Demo Data**
### **4.1: Automatically Import**
From **"**Admin Menu" click **Appearance >> Import Demo Data >>** Wait for about **5 minutes** to import data
**- Import Cube Portfolio Gallery:** From Admin Panel click **CubePortfolio**
### 4.2: Manually Import
**If you use ''Auto Import", you don't need to use '"Manual Import"**
#### **Step 1:** From **"**Admin Menu", click Tools >> Import >> Install Now
#### **Step 2: Import widget data: Tool >> Widget Importer & Exporter**
#### **Step 3: Config "Menu"**
From "Admin Menu", click Appearance >> Menu
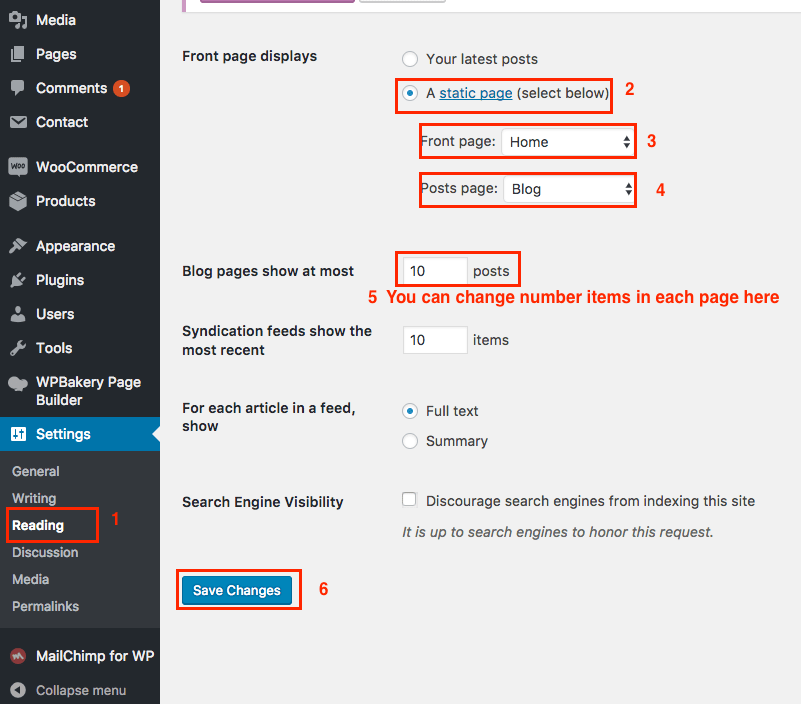
#### **Step 4: Choose "Home Page" and "Blog Page"**
From "Admin Menu", click Settings >> Reading
#### **Step 5:** Import Cube Portfolio
From Admin Panel click Cube Portfolio